Git-#1: Installation

Hello everyone, we’re back with me again. Last time we learned a little bit about what Git is, I’m sure you’re all already understands it, what it does and why is it important, so in this article we’ll continue our topic to:
Git-#1: Installing Git#
To get started with Git, first install it on your machine. This method will differ depending on the operating system you’re using, but don’t worry, I’ve got you covered whether you’re using Linux, macOS, or, cough Windows.
1. Installing Git on Linux#
If you’re a Linux user, installing Git is quite straightforward. You can use your package manager to install it. The commands below will get Git installed depending on your distribution:
- on Debian/Ubuntu based systems:
sudo apt update
sudo apt install git
If you receive any prompts indicating that additional packages or dependencies are required for the installation, just enter Y or Yes, it will automatically install all packages that essentially needed by the main package that you’re installing, so it may run smoothly without you have to setting up manually so much, this also apply for any others linux distros.
on Fedora based systems:
sudo dnf install giton Arch based systems:
sudo pacman -S git
and so on, because linux have about hundred of distros which come from certain linux distribution like Ubuntu, Fedora, Arch and others so you can use your own so you can use your own package manager based on the distribution you’re running. Whether it’s apt on Ubuntu, dnf on Fedora, or pacman on Arch, the steps are pretty similar across the board. Just replace the command with the appropriate package manager for your system. If you’re not sure which package manager your distribution uses, a quick web search will point you in the right direction, i cant write all the possible package managers because it will be too long for this article.
And if you’re one of the real power users, like Gentoo enthusiasts, you’re already compiling it from source anyway. No need for instructions here—you know what you’re doing.
after the installation complete you can run this command to see what version of git youre installing
git --version
if it show the version numbers like this then you all set:

2. Installing Git on macOS#
macOS users have a few ways to install Git, but the easiest method is through Homebrew, the package manager for macOS:
1.First, install Homebrew if you haven’t already by running:
/bin/bash -c "$(curl -fsSL https://raw.githubusercontent.com/Homebrew/install/HEAD/install.sh)"
Homebrew simplifies package management on macOS, making it easy to install and update software.
- Once Homebrew is installed, you can install Git with:
brew git install
Alternatively, Git might already be installed on your system. Run the following command to check:
git --version
If Git is installed, it will show the version number. If not, it will prompt you to install the Xcode Command Line Tools, which includes Git.
Sorry i cant provide the image of result from installing git on macOS since im not yet using macOS system, will update the image soon after i got a device with macOS
3. Installing Git on Windows#
Git is available for Windows systems, and while it may not be as seamless as on other platforms, it certainly gets the job done. It’s awkward, but hey, it can be done. Here’s the step-by-step guide to drag yourself through it:
1. Download Git for Windows#
Head to gitforwindows.org and click the Download button.
- The site will automatically detect your system and download the correct installer.
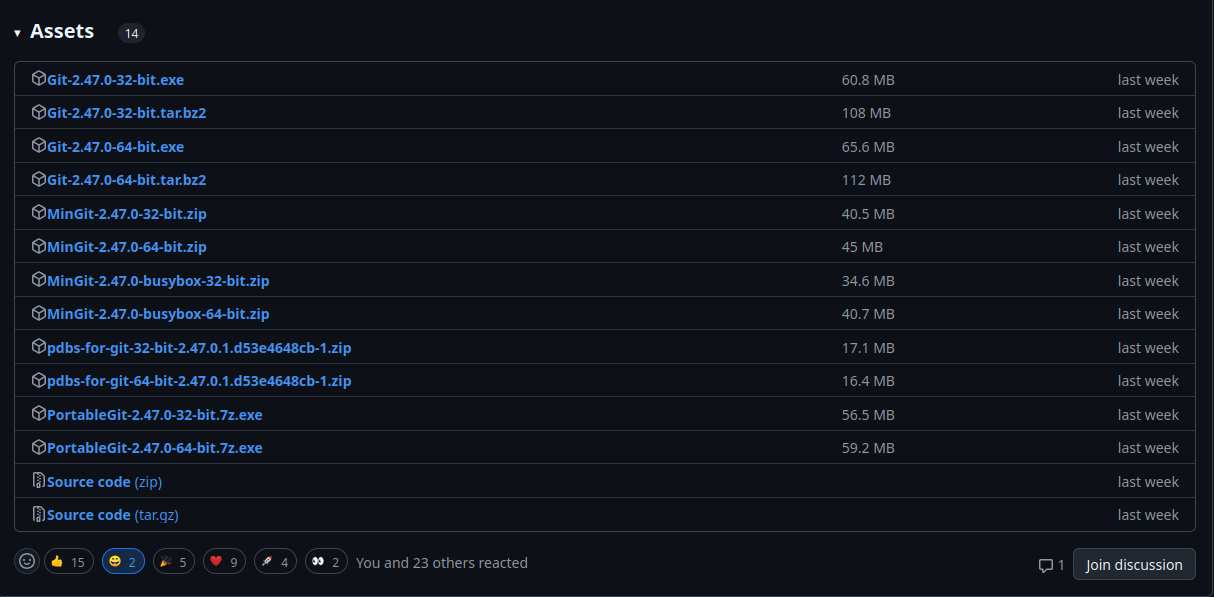
If the automatic download fails, you’ll be redirected to GitHub. Scroll down to the Assets section. Select either:
- Git-2.47.0-32-bit.exe (for 32-bit Windows)
- Git-2.47.0-64-bit.exe (for 64-bit Windows)
2. Run the Installer#
After the download, double-click the installer (
.exefile). You’ll see a greeting screen. Just click Next like a good Windows user.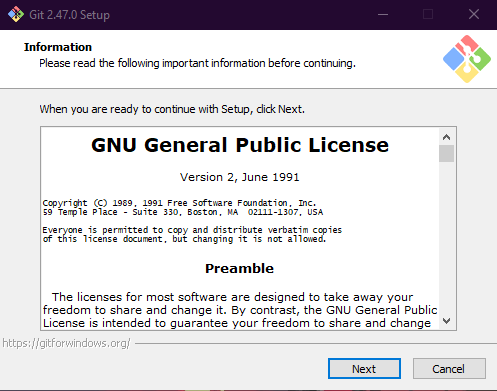
3. Choose Installation Path#
The installer will ask where to install Git. The default path is fine, but if you feel adventurous, go ahead and change it. Otherwise, just click Next.

4. Select Components#
You’ll now see a bunch of checkboxes with options for additional components. The defaults are fine—no need to mess around unless you know what you’re doing. Click Next.

5. Start Menu Folder#
This screen asks where Git should create shortcuts in the Start Menu. Just leave it as is, because, let’s be real, does anyone actually use the Start Menu anymore? Click Next.

6. Choose Your Text Editor#
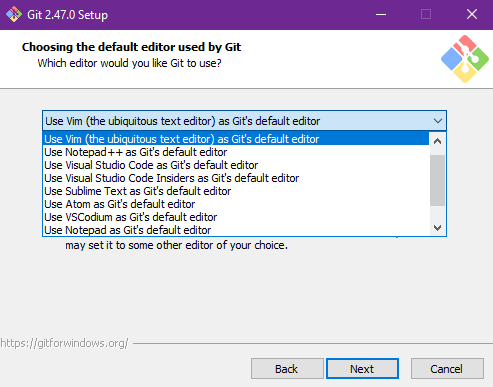
Git will now ask which text editor you’d like to use by default. You can pick whatever you prefer. If you’re undecided:
- VS Code is a solid choice for beginners.
- Atom, Sublime Text, or Notepad++ also work if you’re into simplicity.
Pick your editor and click Next.
7. Adjust Initial Branch Name#
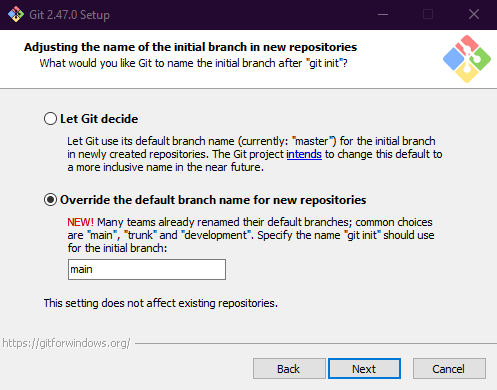
The installer will prompt you to set the default branch name for new repositories. By default, it’s master, but the world’s moving to main for inclusivity. Select Override the default and set ‘main’. Click Next.
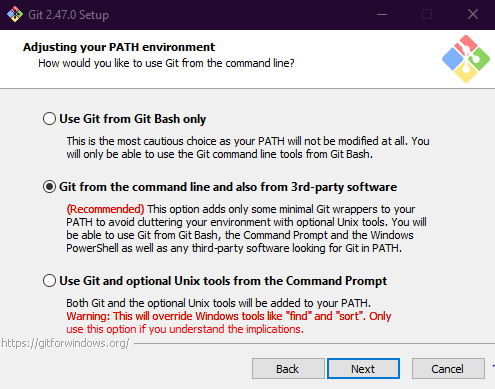
8. Choose Path Environment#
Now, you’ll see options for Git’s PATH environment. Just select Git from the command line and also from 3rd-party software (unless you have a specific reason not to). Click Next.
9. Choose SSH Executable#
You’ll be asked which SSH executable to use. Leave it on the default, Use bundled OpenSSH, unless you have a custom SSH setup. Click Next.

10. Select HTTPS Backend#
Git will now ask which backend to use for HTTPS. Stick with Use the OpenSSL library for maximum compatibility and security. Click Next.

11. Configure Line Endings#
This screen is about how Git handles line endings between Windows (
CRLF) and Unix-based systems (LF). Keep the default Checkout Windows-style, commit Unix-style line endings. Click Next.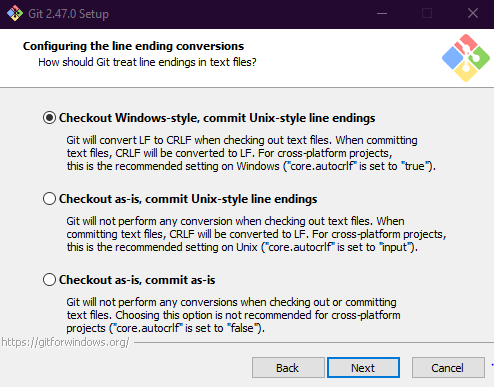
12. Choose Terminal Emulator#
Git offers two options for terminal emulators: MinTTY or the Windows default console. Select Windows default console to avoid confusion (Windows users have it rough enough). Click Next.

13. Default git pull Behavior#
Decide how Git should handle
git pull. Leave it on the default: Default (fast-forward or merge). Click Next.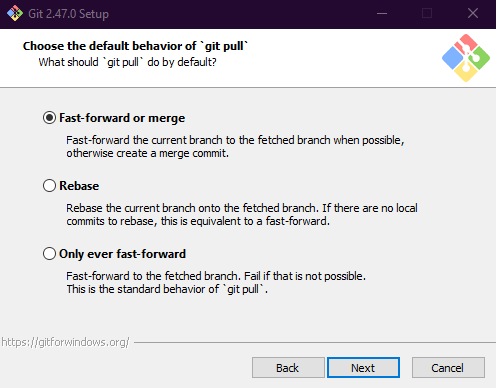
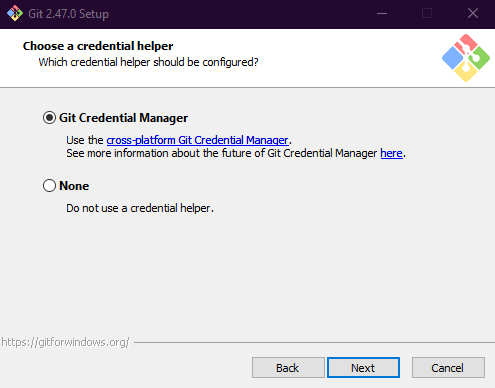
14. Git Credential Manager#
You’ll be prompted to choose how Git should manage credentials. Stick with Git Credential Manager (recommended). Click Next.
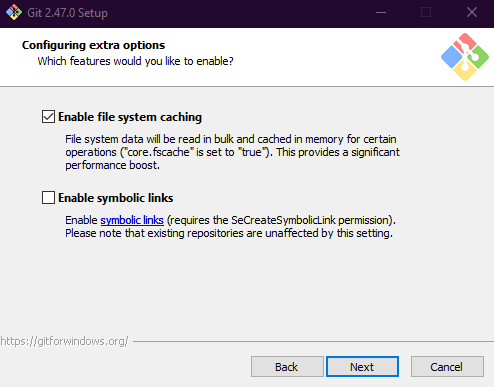
15. Configure Extra Options#
Here, you’ll see some optional settings like enabling experimental features. Skip these unless you’re feeling adventurous. Click Next.
16. Install Git#
Finally, click Install to start the process. A progress bar will appear as Git gets installed on your system.

Once the installation completes, you’ll be asked whether you want to launch Git Bash and view release notes. Uncheck View Release Notes unless you want to dive into the minutiae. Click Finish.
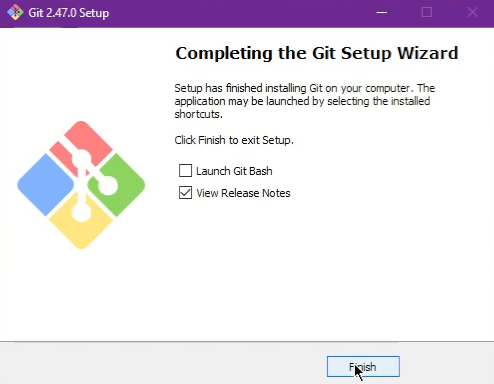
Congratulations, you’ve survived installing Git on Windows. Now you can finally work with Git on a system that’s like the IKEA version of development environments—barely functional but somehow gets the job done.
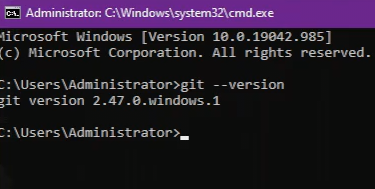
Now let’s check the version and verify that git has been successfully installed by pressing Windows key1 + R, and type cmd in the search bar, then click enter, write this command in cmd:
git --version
If you’re feeling masochistic, you can even use Git Bash…
Configuring Git#
Now that you’ve successfully installed Git (and survived Windows’ mediocre interface), it’s time to configure it. This will let Git know who you are and how to handle certain behaviors when you start working with repositories.
1. Set Your Username and Email#
Git tracks changes by associating them with a name and email. So, you’ll need to let Git know who you are. Open cmd and run these commands:
git config --global user.name "Your Username"
git config --global user.email "your.email@example.com"
Replace "Your Username" and "your.email@example.com" with your actual details, if possible and you have Github account, be sure to make the username and email be the same as in your Github, unless you want your commits to look like they were made by a bot. This is importantly useful when you went to collaborate with others or simply when doing git push to your Github remote repositories ( we will cover about this later ).
2. Set a Default Editor#
You’ll want to set a default text editor for Git to use when writing commit messages or merging changes. If you skipped this step during the installation (or just want to change it), here’s how you can set it up in Git:
git config --global core.editor "nano"
Replace "nano" with the text editor of your choice. For instance, you can use:
code --waitfor Visual Studio Code, this is the best for beginnerssubl --waitfor Sublime Text, this one is beginner friendly too and considerably more lighter, but provide less features than Visual Studio Codenotepad++if you’re stuck in 2007 and still using Notepad++, or when you want more simpler option
3. Enable Colored Output (So You Don’t Go Blind)#
Git’s output can be overwhelming, especially if you’re working in a terminal where everything is the same shade of “bleh”. To make things easier on your eyes, enable colored output:
git config --global color.ui true
Now, instead of a wall of text, you’ll get colorful syntax highlighting to differentiate between added, deleted, or modified lines.
4. Set Up Default Branch Name to main#
Since Git now recommends using main instead of master as the default branch name, it’s a good idea to set this globally so all your future repositories start with main right off the bat:
git config --global init.defaultBranch main
This saves you from the hassle of renaming the branch every time you create a new repository.
5. Enable Credential Caching#
If you’re tired of typing your username and password every time you push to a remote, you can enable credential caching. This will store your credentials for a while so you don’t have to keep entering them:
git config --global credential.helper cache
By default, Git will cache your credentials for 15 minutes. You can set a longer cache timeout if you’re especially lazy (or efficient, depending on your perspective):
git config --global credential.helper 'cache --timeout=3600'
This will keep your credentials cached for an hour.
6. Set Default Merge and Rebase Preferences#
You can also set how Git should handle git pull—whether it should try to merge, rebase, or fast-forward. Most people stick with merge (because change is scary), but if you want to set a different behavior:
git config --global pull.rebase false
To default to rebase instead of merging:
git config --global pull.rebase true
If you’re not sure, stick with merge—it’s the least complicated option.
7. Check Your Settings#
To see the Git configuration you’ve set up, run:
git config --list
This is the result of mine:
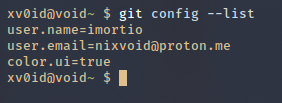
Mine is not too much because I only set the most important ones. Anyway, it will display your global configuration, including your username, email, and other settings like color preferences. If anything goes wrong, re-run the command with the correct values.
Wrapping Up Configuration#
By now, you should have Git fully installed and configured on your machine, whether you’re on Linux, macOS, or yes, even Windows. You’ve also set up your username and email, which are crucial for tracking changes across your repositories. With Git up and running, you’re ready to start managing your projects with powerful version control.
Next, we’ll dive into creating your first repository, and then creating a new github account. Stay tuned and see you in the next topic :D
Note: This article is not yet perfect, could you provide suggestions for changes or feedback so I can improve it later. Feel free to contact me anytime if you’d like here: Email Me or Chat Me on Whatsapp
The Windows key on the keyboard usually has the Windows logo, located at the bottom left of the keyboard between the Ctrl and Alt keys. ↩︎